|
“Shin splints” is one of those broad terms that many people (doctors included) use to describe a very wide range of conditions. In other words, if someone says “shin splints” what they actually mean can be several different things.
Going “by the book,” shins splints is synonymous with “medial tibial stress syndrome” which is basically irritation at the connection between muscle (usually the posterior tibialis) and the tibia (shin bone). Tends to be a repetitive strain condition, but can have underlying causes in mechanics, strength, mobility or training load; or in the case of bone injuries there can be nutrition causes as well. Occasionally, the irritation might be on the muscle itself without any irritation to the bone, in which case it would be some form of posterior tibialis strain or tendinopathy of the posterior tibialis tendon, if closer to the ankle. As for bone injuries, we can have a stress reaction or a stress fracture. The difference is these is basically one of degree. Think of a stress reaction as the beginnings of a stress fracture. Whereas a stress reaction might dissipate within days if given time to heal, a full blown stress fracture can know you out of a solid couple of months. The hallmark sign will be pain/tenderness in a specific spot, whereas many other shin conditions will display pain along a longer segment. On the outside of the shin on the more “meaty” muscle side, we can have anterior tibial tendinopathy or tibialis anterior strain. You may also hear the term “compartment syndrome” which gets tossed around quite liberally referring to pain on the outside of the shin, but full blown compartment syndrome is a true medical emergency, where you’ll experience numbness, loss of circulation and changes to skin texture. The gold standard to diagnose compartment syndrome is to measure the pressure inside the compartment. Sometimes, shin pain isn’t shin pain at all, but is instead nerve pain from the lower back. You could also experience nerve-like symptoms from irritation at the outside of the knee. But in these scenarios, the symptoms are less likely to be associated with movements or direct stress to the lower leg. High ankle sprain is also slim possibility, but unless you’ve had an acute incident of twisting your ankle or lower leg, it’s safe to rule this one out. Ultimately, these diagnoses are simply descriptive labels. Most important is identifying how and why these are happening, but understanding that many different conditions can exist under the realm of “shin splints” is a good way to start!
0 Comments
“What’s harder..Road marathon or trail ultramarathon?”
I’ll start by saying neither is “harder” than the other; both are more challenging in their own right. I will say that marathon is a more intense pain but that’s only one metric of “harder.” The marathon inflicts the punishment of repetitive strain being on the road for 26.2 miles, basically using the same muscles in the same way for hours. Some mild hills can create some variety, but that can also make the course slower (we’re assuming that the goal is to compete the courses in your fastest possible time). If the hills get too big, they can punish your quads on the downhills. But regardless, you can expect your legs to be VERY sore after a full effort road marathon, especially if part of the course takes you to concrete. The intensity of the road race is also higher as most competitive runners are working toward the upper half of their aerobic energy system. In the ultra, I was sore but not nearly as sore as after road marathons. To an extent, this shouldn’t be surprising because the ultra included bouts of walking during some uphills when I caught up to people on a single track and also when going through the later aid stations. Additionally, most ultras are contested mainly on soft surfaces, which inflicts less pounding. Add in the technical nature of many ultra courses and you have a recipe to spare your legs a bit…even though you have more ground to cover than on the road. Some notes for a Zoom Q&A session where I was a guest of Run Tucson and The Workout Group 1. Why is adding some strength into your routine helpful for running? Strength makes more adaptable as human beings. We are constantly exposed to stressors, some good, some not so good, and improving the physical as well as mental quality of strength provides a better internal ecosystem within our body to make appropriate adaptations to those stressors…the stress of pounding the pavement the skill of making corrections on the trail, reversing the pulls of office life, the natural biological processes that occur with aging (loss of muscle, loss of tissue elasticity) counteracting the catabolic (tissue wasting) processes that accompany moderate to high volume aerobic training Historical evidence: the clusters of populations that have been successful over time have all had some basis in strength training practice. "Old school" Americans came from active lifestyle and many worked manual jobs at some point in their lives; many of the the African runners work in agriculture and have minimal access to motorized vehicles; Japanese runners enjoy very robust physical education programs in their youth 2. Are activation and stability exercises considered strength training? Yes, but for most people in the same way that mashed potatoes and asparagus fit into a meal with a steak. They’re food but they are side dishes. You can still get an adequate meal by ordering off the appetizer and sides menus and that might be all you need at the time.(Or its like a Clif Bar or gel pack aren't the same as a complete meal but in the right time and place they’re more appropriate for the situation than a giant steak.) So yes activation fits under that broad umbrella category of strength but it’s important to appreciate their proper context and limit yourself at activation exercises when you can still benefit from taking it a step further into strength training. Ultimately, activation and stabilization are prerequisites for quality movement. When we’re assessing the strength of an individual muscle, the scale runs from simply asking whether the muscle can actually activate all the way up to can it move our body against gravity and external resistance. Its all the same scale, just all part of a continuum. For a lot of things where we are highly proficient, something in the realm of activation or stability might not be an adequate load or stimulus to improve strength. But for some areas where we might be less developed or proficient, such as lateral movements, simply activating or stabilizing against a modest load might be all the stimulus you need to be challenged. But in the end its all part of the same neurological processes 3. How should someone start adding strength into their routine? Conduct a needs analysis – are you historically injured and maybe have done some strength associated with rehab but just never stuck with it? Are you historically healthy and just want make sure your bases are covered? The answers to these types of questions will help guide you to YOUR best starting point. Set up your environment for success – we’re in a unique situation right now where involving the family in a fitness routine is a very positive development, both for enjoyment and accountability Start with your running schedule and work backward from there Easy victories – Don’t have to be on some elaborate plan, especially if you’re starting from basically scratch 4. If you could pinpoint 5 strength exercises that are the most helpful for runners, what would they be?
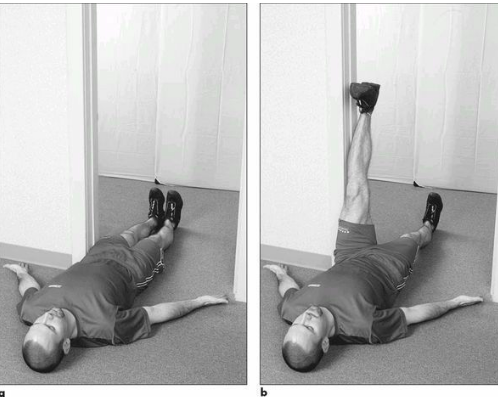
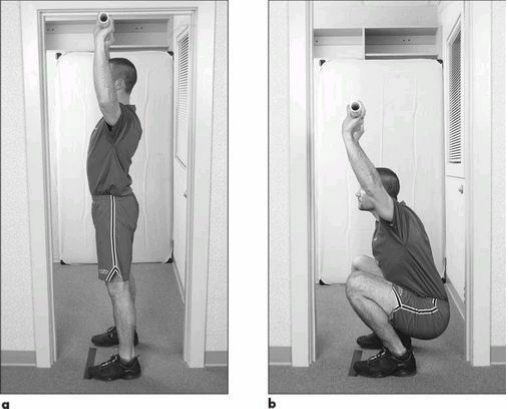
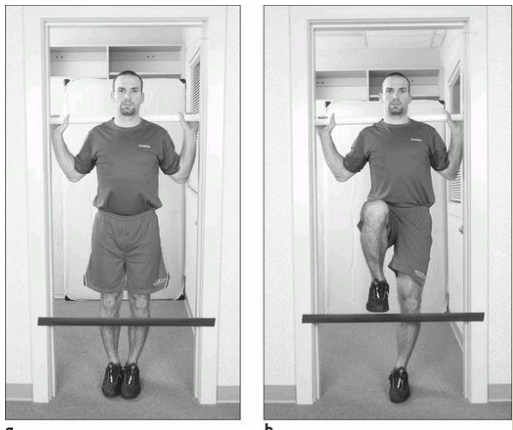
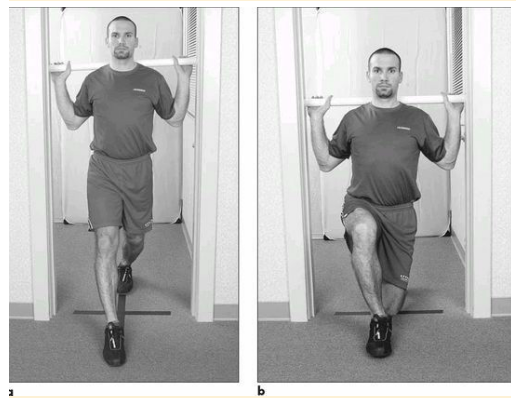
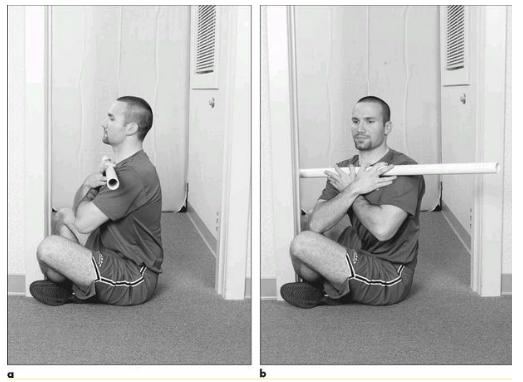
Strive to include an exercise from each of these categories. The specific exercises will be different for everyone, but these are the key movements to focus on. The examples provided are some of my preferences, but there are many options to choose from. Pull - pull ups, rows Push - overhead pressing, push ups Hinge - single leg deadlift, glute bridge Squat - split squat, goblet squat Core - plank, Turkish getup 5. Can runners over-do it when it comes to strength training? Absolutely! But the effects are typically subtle and the effect can be be delayed for several days or weeks Biggest problem I see isn't overdoing it in an absolute sense, but in a relative sense. Most of the time when runners overdo it, the overdone program wouldn't be too much if they weren't also serious about running. Usually, the error is failing to protect quality run days from interference of lower body strength work. The magic, the essence of any training approach isn’t what we decide to do or what the coach decides to do…its what we choose to NOT do… 6. Is there anything we should stay away from? Compressing or cutting out the rest periods. Shortening the rest sounds like a good idea and feels natural for an endurance athlete.... "lets save time and be efficient" or "it really feels like I’m getting after it because my heart rate is up" or "I can't stand waiting around between exercises for a couple minutes." This thinking also drives many commercial models based on HIIT training or some form of circuit training. There can be value in these when presented a certain way, but the more we shorten the rests, the more we deviate from actual strength training. If you need more endurance, then look to your running program, don’t try to create something in the gym. Here's a very simple movement assessment that I often recommend to people that you can complete on your own. This five part assessment has been around since the 1990s and is something I've used remotely with athletes for years. But with the shift of more training and treatment into the virtual space, this assessment and others like it are becoming more integral pieces of the training process. Originally appearing in Gray Cook's Athletic Body in Balance, this assessment looks at five movement patterns: an overhead deep squat, hurdle step, inline lunge, active straight leg raise and trunk rotation. You may recognize a form of these from the Functional Movement Screen. Other than some small details in execution, the main difference is these are graded on a PASS/FAIL basis. The purpose here is not to dissect movement into minute details but instead to have a way to quickly determine if someone has major gaps that we need to identify before exploring heavier loads (which can take the form of additional weight, speed or complexity). There are plenty of different ways to assess remotely, but I have found this one to seamlessly transition into the next phase of the training process. You might wonder," only five PASS/FAIL moves, how can that be of any value?" Remember this is simply a starting point that guides us to the next step, whether that is getting after it in training or doing more detailed assessments of particular results (that might otherwise be unneeded in some individuals). Bottom line: If you have an injured limb and are unable to train as normal (or train at all), training the other side can still yield benefits of the injured side Question time….Let’s say you injure your left knee. What is the best strategy for your training plan? 1 Push through pain no matter how bad it is. Don’t change your training plan. Rest is for sissies 2 Continue to train the right knee, so long as it doesn’t further injure or provoke symptoms in the left 3 Stop training both legs because you don’t want you’re right leg to become too strong relative to your left and develop an asymmetry There is a “best” answer here and that answer is number 2. Answer number 1 is ridiculous, so we’ll put that one aside. Number 3 sounds compelling and while it wouldn’t necessarily be “wrong” to go that direction, there are several reasons why number 2 is better. Again, this is all based on the caveat that the training you do for the uninjured limb doesn’t put the injured limb at further risk of injury or delay healing. For example, let’s say you were doing some single leg activities on the uninjured leg, but each impact sent a “shock” through the injured leg. Your best bet is to either find different activities or delay training the uninjured limb until it can be done safely without provoking the injured limb. In the literature, the concept of training effects on one limb being felt on the opposite side limb is called cross education. And to the surprise of some, the evidence is quite clear that cross-education works. Unfortunately, what should be the standard of care (training the rest of the body at the highest level possible in a way that supports the healing process), is instead a novel concept to many. There are several reasons why cross-limb education is not promoted more. One is that the medical process is often siloed and sees the world with tunnel vision. For example, most orthopedic surgeons are going to just look at the injury and not even consider. That’s not meant to be critical, it’s just the nature of their job. They’re good at going into a damaged body part and making structural corrections using surgical techniques. They aren’t paid to tell you how to train. Similarly, most PT’s in a “traditional” outpatient setting aren’t getting paid to consider the opposite leg (and in some cases are actively discouraged from looking anyplace other than the site of the injury…Not their fault, that’s just the nature of the system in which they work). uninjured limb.
What does the evidence say?....A meta-analysis by Green (2018) reviewed 96 studies on cross education involving healthy young adults, healthy older adults and patients, finding an average strength gain via cross education of 18% in young adults, 15% in older adults, and 29% in a patient population. Although prior meta analyses had shown conflicting results on gender differences and upper versus lower limb effects, the studies compiled by in the Green meta-analysis revealed no significant differences. Overall, the average cross body transfer ranged from 48%-77% in the compiled studies, meaning that the immobilized limb experienced strength gains of 48%-77% of the trained limb. Again, this isn’t just one study on a homogenous group of subjects…this is 96 studies in a variety of populations. (Another interesting finding was that electrically stimulation of muscles appeared to have a greater cross-education effect than voluntary stimulation). WHY cross education works remains up for debate but most evidence points to neurological mechanisms as the primary factors. Per Cirer-Sastre (2017), “this owes to the fact that no significant vascular adaptations have been found, nor were any histological changes in hypertrophy levels, in enzyme concentration, in contractile protein composition alteration, in fiber type or in cross-sectional area.” In short, strength is function of the nervous system, and the effects of nervous system output are global, meaning not specific to any single body part. Although the evidence has been relatively settled that cross-education does exist via single sided training, HOW to facilitate cross-education is less clear although a meta-analysis of ten studies by Cirer-Sastre, “to optimize contralateral strength improvements, cross-training sessions should involve fast eccentric sets with moderate volumes and rest intervals. Finally, approaching this from a pragmatic standpoint, if you sustain an injury to a limb, you could continue training the other limbs and have three “good” limbs or you could stop training both the injured and non-injured arm/leg and have two “good” limbs. Which sounds better? The concern about developing asymmetries is logical, but overall is far overblown. As we know from the research, the cross-education effect will mitigate strength losses from inactivity by an injured limb. Further, even if cross-education did not exist, you’re better off having to bring one limb up to speed rather than losing strength in both sides have having two limbs to return to normal. Simply makes no sense why you would voluntarily weaken a perfectly healthy limb. Even if an asymmetry develops during a recovery period, its not as though you were going to hop right back into peak training after you get over the injury. You might as well give yourself the highest “baseline” with a strong, healthy limb rather than let both sides regress. REFERENCES Lara A. Green & David A. Gabriel (2018) The effect of unilateral training on contralateral limb strength in young, older, and patient populations: a meta-analysis of cross education, Physical Therapy Reviews, 23:4-5, 238-249, DOI: 10.1080/10833196.2018.1499272 Cirer-Sastre R, Beltrán-Garrido JV, Corbi F. Contralateral Effects After Unilateral Strength Training: A Meta-Analysis Comparing Training Loads. J Sports Sci Med. 2017;16(2):180–186. Published 2017 Jun 1. What is the Endurance Exchange conference?..."USA Triathlon and TBI are introducing the Endurance Exchange conference in an effort to grow, inspire and support the triathlon community by collaboratively hosting the nation’s largest experiential triathlon summit where everyone within the multisport community can learn; share best practices, trends and innovations; network; and celebrate. Endurance Exchange replaces the TBI Annual Conference, which was initially scheduled in Tempe for the same dates. It also comprises two former USA Triathlon-hosted industry events, the USA Triathlon Race Director Summit and the Art and Science of Triathlon International Coaching Symposium."
Some notes from the lectures that I attended (there were 2-4 different lectures simultaneously in different rooms at the magnificent Sun Devil Stadium at Arizona State University) Mental Health & Performance
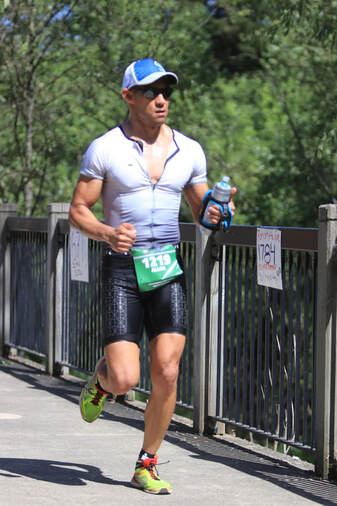
Last year I took on my first full Ironman at Ironman Santa Rosa. Circumstances were not ideal, given that I was fully immersed in an accelerated Doctor of Physical Therapy program. However, with some friends putting together a group trip to the race, I couldn’t pass up a chance to tackle the distance with a good crew. A “proper” base build was totally out of the question. Rather than pass on the race, I took the attitude of “Do my best given whatever resources I have available.” If time is a limitation, then we make the most of the time we have (note: this doesn’t mean hammer every session…more on that below…) Long training history and high training age help a lot. I did my first triathlon in 2001. Minimalism probably isn’t for anyone attempting a couch-to-Ironman program. But it can be done with a large fitness, base even if it comes from a single sport. Based more than 15 years of base, finishing this “long training day” was not an issue. It was simply how much can I sneak into the “zone of performance” without a high risk of complete blow up Although I said not every day should be a hammer session, your training will definitely shift more toward the “quality” end of the quality vs quantity continuum. Let’s start with swimming (in full disclosure my swim was a disaster, but I largely blame that on a poor wetsuit fit rather than fitness). Swim people may be familiar with USRPT, or Ultra Short Race Pace Training. If you want the details of this approach, there are plenty of resources HERE Sample USRPT workout Repeat 50s on an interval giving approximately 20 seconds rest. Select a target time for each rep (say 40 seconds for example). Keep swimming until you swim a rep slower than 40 seconds. Once that happens, you sit out the next rep. Continue this pattern until you miss three reps. Here’s the bottom line for swimming: quality rules. Don’t get sucked into the long slow distance approach that can be effective for bike and running. You don’t have to follow USRPT but you shouldn’t forget that swimming is a strength and technique sport. That said, and this may sound contradictory, If there’s one thing I wish I would have done differently it is implement one weekly long continuous swim. You might be wondering, why bother swimming if it is by far the shortest portion of the event? In my opinion, swimming has the greatest fitness carryover to other events and is also the one least likely to cause injury. Another key component of swim training was pulling with paddles/buoy/band. Technically this is not pure USRPT (which forbids the use of “toys”) but because paddles/buoy/band is the most effective way to simulate wetsuit swimming, it deserves a place. Also, if you follow the philosophy of Brett Sutton, which I do to an extent, you’ll also realize the paddles/buoy/band combo is simply a good way to get good at swimming. Run training. Two to three key runs per week. All other runs 30-60 minutes of easy running. The key runs included:
a) Short fartlek such as 15 x minute hard/minute easy b) Longer fartlek such as 6 x 3 minutes hard/90 seconds easy c) Easy to moderate paced long run of 10-12 miles (longest single run of the prep was 12 miles) Ideally, run your long runs on hilly, soft terrain. This will protect your legs and also build run specific strength Why fartlek? There were times during travel during which I was time crunched. Sometimes the whole workout was 8-10 x 50-100m running sprints at 95% effort. If you can’t get in volume, be sure to get in some quality. But again, quality does not mean thrashing yourself with puke-fest HIIT workouts day after day… Speaking of strength. I’ve often said that kettlebell swings have been a secret to maintaining bike fitness without actually biking lol.. My strength program was relatively informal, but was a mix of low rep kettlebell lifts (mainly the bent press) along with bodyweight (one arm one leg push up and pull ups). In my opinion, carving out some time for strength can be beneficial for health and injury prevention. The key is to find ways to limit the footprint that strength training has on the overall week. Unless you live very near a gym, driving any significant distance for strength training during a minimalist Ironman approach is simply a waste of time because there is so much you can accomplish away from the gym I wouldn’t use strength as a way to replace workouts, other than occasionally on the bike, but that was many weeks before the race. Using the grease-the-groove approach is effective if you have the latitude to make it work. That’s probably the most time and resource efficient way to accomplish what you need without borrowing time from swim/bike/run training. We often use “minimal effective dose” as a worn out cliché, but it really is the best philosophy in this context for strength Biking was mostly Spinervals videos under one hour. Occasionally for shorter rides I’d pull something on youtube that seemed to fit the session objective (recovery, intensity, etc). Only once did I go over two hours indoors. One of the keys to indoor riding was also the opportunity to spend time in the aerobars. Watch any Ironman and halfway through the bike, hundreds of athletes are seated up, out of the aerobars (quite the irony whenever you see an athlete on a $8,000 bike riding as unaerodynamically as possible). Despite low mileage, spending such a high percentage of my bike time in the aerobars was an example of “free speed.” Longest ride outdoors was 75 miles, but done at a moderately intense effort on a bike path with minimal stops. You hear a lot about the magic century ride for Ironman, but how often are these done with traffic stops and even coffee stops, not to mention when in a group where you can’t safely hang out in the aerobars for long stretches. Nutrition...This is one area where experience is especially valuable. With limited opportunities to truly rehearse race day fueling, you’ll have to rely upon what worked in previous races. This might scare some people but I also believe that many nutrition problems are really pacing problems. In other words, when people say “I didn’t get my nutrition right,” what really happened is they went out too hard on the bike and their stomach couldn’t adequately fuel a pace that was unsustainable from the outset This part is hard to quantify, but I was especially attentive to fatigue from travel or other life events. Since the volume was low to begin with, there was no need to force anything. I’ve trained myself out of plenty of races over the years and I wasn’t going to make that same mistake for my first Ironman Overall, it’s really not that complicated. Key points are mindset and expectation management. And then sticking to the race day plan. Having limited training volume simply reduces your margin for error but does not preclude a successful outcome. There’s an old saying that being 10 percent undertrained (and healthy) is better than being 5 percent overtrained. A minimalist Ironman prep is a perfect way to put this concept into practice. You may surprise yourself when you give yourself the chance to arrive at the start line fresh and chomping at the bit to go race. Allan Phillips, PT, DPT Oro Valley Physical Therapist, USA Triathlon Certified Coach The Happiest Place on Earth. Or so they say. Who knew that having a full day of fun could be so much work? One of the oft unspoken aspects of any Disney Park experience is the physical fatigue from 10 or more hours of play. You’ll spend a lot of time on your feet, walk long distances…and sometimes do it for close to a week! With this in mind, one way to maximize your enjoyment of your Parks experiences is to arrive your best physical condition possible. You don’t need to be in marathon shape (and it wouldn’t be a complete form of preparation, because the physical demands are different), but you don’t want your body to hold you back. Think of it this way: At Disney, time is money and money is time. If you need to take lengthy breaks, you are paying for time doing nothing! Yes breaks are essential to maximize the quality of your experience but there’s a balance between just right and too much. Now, I’m going by the assumption that you are going to Disney to DO stuff as there are far better destinations for relaxed idleness. My PERSONAL preference is to cover lots of ground, but yours might not be. And that’s fine. The main point is that your physical readiness should be sufficient to support YOUR desired activity level! Footwear – Quality athletic shoes that fit are paramount. You could walk up to ten miles in a day. Socks are also overlooked and are not something to skimp on. Your regular socks that do the job for routine walking at home might not withstand the heat and moisture of long days, especially in Florida. In the military, sock changes are built into our road march routine. You can have the strongest lungs and legs in the world, but the pain of an open blister can turn your day into complete misery. Also consider investing in Bodyglide, which is a sports lubricant without any residue (I have no affiliation with them, but have used it for close to twenty years). Walking – You don’t need to walk ten miles a day to prepare but you do need to be ready for walking a lot. Other things to consider..stair climbing is also helpful because there are some attractions involving stairs (Swiss Family Robinson, Sleeping Beauty Castle, Main Street Train Station), though generally the parks are flat. Additionally, sometimes the challenge isn’t only from the walking but also from being on your feet for so long during the day. If you’re used to sitting for 8-10 hours per day, spend time building yourself up to where you can comfortably spend prolonged periods on your feet. Carrying Stuff – You may find yourself carrying a bag or even little people! Prepare accordingly but don’t go crazy and put yourself at risk for injury. Some things to consider: will you be carrying a double strapped backpack? Or something like a purse that hangs on one shoulder. If you are carrying kids will you be carrying them on your back, on your shoulder or in front? How much do the kids weigh? Stroller? This is a simple one. Get out the baby jogger and start pushing those sleds, especially if you choose to load up the stroller with your supplies for the day or if you choose to rent a stroller from the Parks that is heavier than what you’re accustomed to at home! If you’re at Disneyland, you know you’ll face a small climb back to the center of the park if you visit Winnie the Pooh. Food – I’m hardly a diet guru but I would offer some pragmatic advice. Be a little extra “good” before going if you’re worried about over-indulging. But don’t be so restrictive that the Disney influx of sugar sends your gut into a frenzy. Bottom line, give yourself months in advance of quality eating, but enough small indulgences sprinkled in to help develop the gut adaptability for the wide variety of tastes you may encounter in the Parks! Intra-trip recovery – a restorative massage is always a good option if staying at one of the Disney resorts offering spa services. However, there are some free options available as well. Getting in the pool and kicking your legs around can help encourage quality circulation and facilitate the recovery process. Your resort gym may also have self-massage tools such as foam rollers. Better yet, invest in your own and bring it with you!
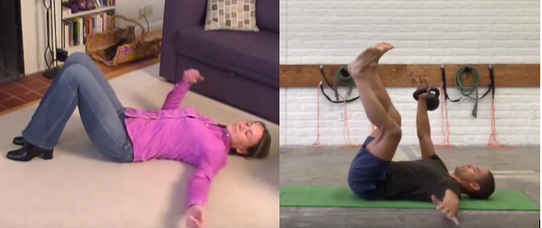
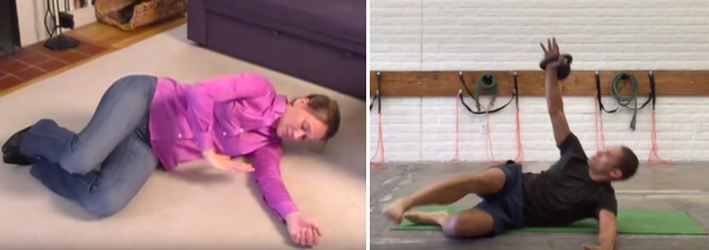
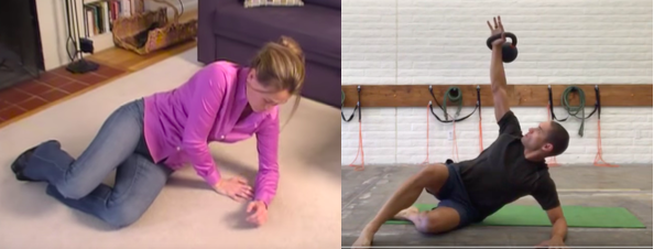
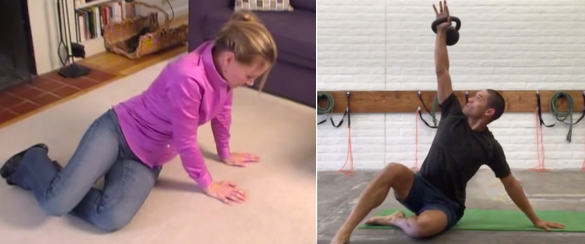
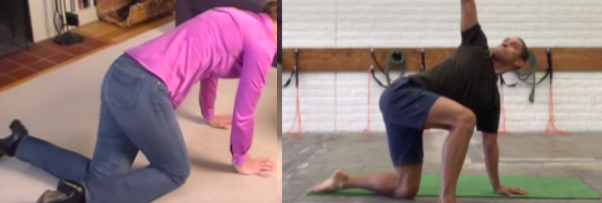
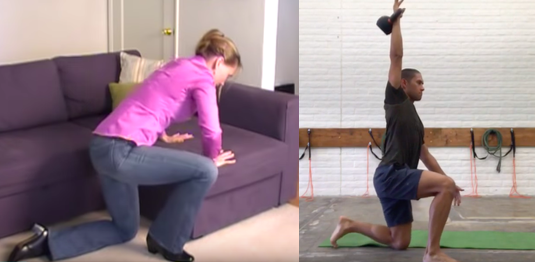
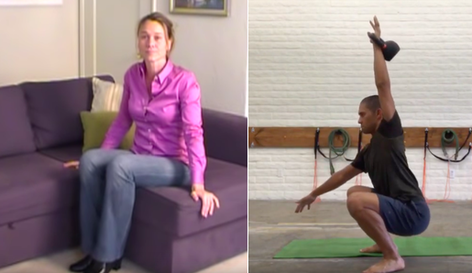
Exercise – For most of us, the fitness routine is not the main priority during a Disney visit. That said, if staying at a resort onsite, the exercise options are serviceable. Some will offer morning yoga or other group classes on certain days (though it could mean forgoing Magic Morning Hours). The fitness centers are generally decently equipped, at least enough to accomplish something (which is better than nothing!). Another way to go into a trip is to schedule a hard block of training immediately beforehand so you can use the vacation as a time to “recover” from your normal activities at home. The trip won’t be complete recovery, but it will serve as a break from the normal routine. CONCLUSION Like many things, it all comes down to thinking ahead and preparation. I have simply provided some options and suggestions here, but other strategies may work for you. The main point is to recognize the key areas and have a plan for your trip...just as you have a plan on how you are going to navigate the Parks! Exercise can be life saving. And I do mean that literally. Falls are one of the leading cause of accidental deaths worldwide. In the United States, a high percentage of accidents occur in domestic environments that we would typically consider "safe" (as compared to developing countries where many falls result from hazardous conditions). Fortunately, especially in safe environments, falls are preventable and fall recovery is TRAINABLE. Though there is plenty of discourse about fall prevention, there is less talk about fall recovery. I'd like to work backward here and start with the recovery piece because it can also have a profound effect on the prevention piece. The first key, and perhaps most important, is a mindset shift. Conventional thinking has us believe that loss of strength, mobility and function is inevitable with aging. While certain physiological changes are undeniable, we DO have the power to mitigate the effects via intelligent and consistent physical training. Believing that you can remain strong, mobile and functional indefinitely is the foundation. It is true that "Father Time is undefeated," we don't have to let him win so quickly.... Even outside the context of falls, we should also be reminded that the ability to rise from the floor is closely linked to general health. A famous recent study in the European Journal of Preventive Cardiology (de Brito 2012) found in a sample of 51-80 year olds that the ability to sit and rise from the floor was a significant predictor of all-cause mortality. In that study they used a hands-free rise as their assessment, but the general concept should apply universally. So how to we use exercise to train fall recovery? One way is through variations of the Get Up. The variation which I will cover here is the Czech/Baby Getup (named as it replicates the developmental sequence that babies follow from 2 months through 12 months). This a great way to systematically build the strength and confidence to rise from the floor. Typically, if someone struggles with the movement, there may be one or two stages that hold them back. But because we can break down the total movement into stages, that person can fast track themselves to success. To show how the Get Up can transfer meaningfully into the real-world skill of recovering from a fall, I have placed several key stages of the Get Up beside key stages of a person successfully recovering from a fall in the home (note: this was only a simulated fall demonstrated by an occupational therapist, not an actual fall. You can find the complete video here). As you look through these images, pay attention to the similarities in alignment and support, particularly how we rely on skeletal structure for foundation. I hear many people say "oh I'm not strong enough to get off the floor," but strength is rarely the primary limitation. Instead, if you know what positions to seek on the ground, the strength demands are achievable by most people. The first step above is getting yourself "organized." In the Getup we use a "90-90" position representing 3-6 months as our base. After a fall, the key is to get yourself into a position where you are prepared to move to a more advanced stage. Next we move into a position based on 5month sidelying. In the prior stage we had our entire backside for support. Now we have progressed to lateral support, though you should still have adequate stability to allow transition to the next stage... The 7 month low oblique sit is a transitional movement that begins to create separation from the ground. Instead of lying entirely on your side, you transition to low support on your bottom elbow. As noted above, this is more a test of knowing how to position yourself rather than a test of raw strength. In "real life", rather than holding a kettlebell in your top arm, you can use that arm to help prop yourself up. If you can accomplish this transition while training with a kettlebell then doing it "for real" is entirely in your ability! In the 8 month high oblique sit, we have transferred support from the elbow to a straight arm, but the overall concept is the same. Now, the left photo is actually about a half step in advance (having begun a transition into crawling), but that's mainly because her right arm is free to add support to her left arm (and she also knows her next move is to initiate crawling). The main key here is that transition from the elbow to the outstretched arm, training it in the gym with single arm support, but also knowing that you'll likely have both arms to help ina . real scenario. I've zoomed in slightly with this one because I want the focus to be on the legs, which are now organized into a forward crawling pattern on the left and a slightly advanced tripod position on the right. Without holding a weight you could certainly transition directly from sidelying into crawling, but with the weight in hand you are driven toward a more uprighting direction rather than horizontal travel as in a crawl. We are almost there! Now it is time to stand up. In a domestic environment, once you have crawled toward a piece of furniture to help prop yourself up, use your arms for support and propulsion and just stand up with your legs. The kettlebell variation involves the same pattern but without the arms to help. However, one subtle move that is key for the kettlebell Getup and that would make standing up easier at home is to flex that back foot so it can provide a little extra drive. You should be able to move to higher ground without it, but know that it is there if you are struggling. And now we're safe! One you get up to the couch at home, you can gather yourself and assess your body and call for help if you need any injuries attended to. In the gym however, we can finish off the sequence with a little overhead squat. Either way, the we've reached our objective, though in the gym we're going to reverse the move to complete the rep.
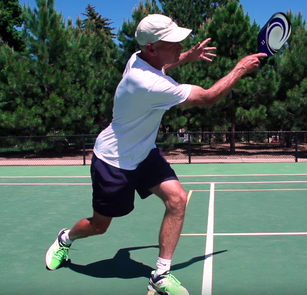
CONCLUSION Hopefully this explanation adds clarity as to WHY the Getup is such a powerful set of skills to own. Yes, there are MANY ways to teach recovering from a fall and many critical skills to help prevent a fall, but we find the Getup (especially this version) to offer a well organized teaching and treatment template. Even if this is not something you personally struggle with, chances are someone close to you may benefit from improved function in this area. Additionally, although I started this discussion with a gloomy backdrop of fatal falls, also consider the positives that can result from maintaining the ability to rise from the floor. How often do we hear people lament the inability to play with their grandkids on the floor? Too often people accept this loss of function as inevitable and permanent, which is unfortunate, because these skills can be cultivated when progressed safely. Think of all the enrichment it would add to your life and your family's life when you not only maintain your mobility but even expand it! If you need any guidance in this area, whether for personal training or physical therapy, please reach out to us here or visit us in person at GRITfit, Inc. at 7980 N. Oracle Rd.; Suite 110, in Oro Valley, Arizona. Pickleball seems like simple game on the surface, which is part of its appeal and massive growth recently. But like many things, there’s a lot more to the game. Take the forehand for example. It’s a relatively simple shot that even the most rudimentary beginner will naturally attempt even without coaching. While refining your fundamentals it is vital to understand whether your body has the underlying capabilities to achieve those more complex positions and movements. If you’re trying to rotate more, you must ask what are the joint requirements to achieve that rotation? Here are three essential physical qualities that you must cultivate to achieve an optimal forehand for your body and more importantly, stay healthy. 1) Lead hip internal rotation For a basic forehand where you have time to set up for the shot (not running off balance), the ability to internally rotate your lead hip (the L hip for a right-handed player) is essential. A simple way to illustrate internal rotation: stand normally with your feet pointed forward and then try to turn your pelvis to the left without moving your feet. That motion occurring at your left hip is internal rotation. Why is this important in pickleball? When you plant your front foot during a forehand, much of the rotation through the shot comes from internal rotation of the lead hip. Yes, some other parts of the body rotate as well, but the hip is a critical piece. If you lack hip internal rotation and don’t make appropriate accommodations with stroke technique, you may find the shot ineffective, or at worst, injurious if repeated several thousand times over a playing career. Here's a quick way to assess and train your hip internal rotation from the Functional Range Conditioning library 2) Upper and lower body disassociation This might sound like a complex term but fear not, it is actually quite an intuitive concept. The transition from the backstroke begins with the transfer of pressure from the trail leg (right for a right-handed player) toward the lead leg. This move is initiated from the lower body WHILE the upper body stays back momentarily. After that shift has occurred in the lower body, then the upper body begins to rotate through. Why is “disassociation” important in pickleball? If you can’t move your lower body and upper body independently of each other, your stroke will be a mess. Watch a toddler try to swing a bat or racket and you’ll see what poor dissociation looks like as they turn their body as a single unit rather than with a gradual progression of forces. Here is a simple drill to both assess and train dissociation. 3) Trail wrist extension For a right handed player the trail wrist is the right wrist. Wrist extension is when you bend your wrist up, the direction opposite from your palm. If you lack wrist extension your body may be forced to compensate elsewhere, which is one reason we see shoulder and elbow injuries so common in the sport. Wrist position will certainly change based on the type of shot but for the forehand some amount of extension is necessary. Note that wrist extension is also important for many activities of daily living such as driving or helping rise from a seated position. Summary
These are just three motions, but they are three of the most important. Injury prevention is more than just a good warmup and some stretching; it also means building a game that matches your body’s capabilities and molding your body to meet the specific demands of your game. If you need any assistance with a movement assessment specific to your demands on the pickleball court, please don’t hesitate to reach out to us! |
AuthorAllan Phillips, PT, DPT is owner of Ventana Physiotherapy Archives
December 2023
Categories
All
|
2951 N. Swan Rd.
Suite 101, inside Bodywork at Onyx
Tucson, Arizona 85712
Call or Text: (520) 306-8093
[email protected]
Terms of Service (here)
Privacy Policy (here)
Medical disclaimer: All information on this website is intended for instruction and informational purposes only. The authors are not responsible for any harm or injury that may result. Significant injury risk is possible if you do not follow due diligence and seek suitable professional advice about your injury. No guarantees of specific results are expressly made or implied on this website.
Proudly powered by Weebly




 RSS Feed